While it is possible to design a document by setting the paragraph formats and fonts manually, this has a number of drawbacks. Firstly, it tends to lead to a document that has a range of contrasting fonts and lacks consistency. Secondly, if you decide you want to change the font for the entire document, this must be done at each point in the document where a new font is used.
A better way to format your document is to use styles. A style is a predefined set of font and paragraph formats that may be used for a particular purpose. Abiword comes with a number of pre-defined styles for a range of purposes.
You can see the pre-defined styles that Abiword provides by clicking on the Style tool on the toolbar. When you first start Abiword, it will be displaying the Normal style, however if you click the pull-down box (that looks like a downward pointing triangle), a list of alternative styles is displayed. See the diagram below:
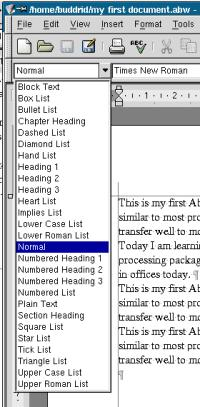
The default style, when you start a new document, is Normal. The other styles that are available are described below:
Style Name Description
Block Text This style is used when you are quoting large chunks of text.
Box List This bulleted list uses boxes for the bullets.
Bullet List This is a simple bulleted list that uses dots as the bullets.
Chapter Heading This is a numbered heading style
Dashed List The dashed list is a kind of bulleted list using dashes for the bullets.
Diamond List This is another kind of bulleted list using diamonds for bullets.
Hand List This is a bulleted list that uses hand symbols for the bullets.
Heading 1 This style is used for main headings for your document. For example, for chapter headings.
Heading 2 This is for your chapter sub-headings. It uses a slightly smaller font.
Heading 3 For you
Heart List This is another bulleted list, using hearts for the bullets.
Implies List This is a bulleted list that uses the Þ symbol for the bullets.
Lower Case List This is a numbered list that uses lower case letters for each item.
Lower Roman List This is a numbered list style that uses lower-case Roman numerals.
Numbered Heading 1 This style is the same as Heading 1 except that it automatically adds a number to the heading.
Numbered Heading 2 This is the same as Heading 2 except that it automatically adds numbers. It will automatically pick up the number of the last Numbered Heading 1 and incorporate that into this number. So if the last Numbered Heading 1 was 1. Heading, then this style will become 1.n where n is the number of this heading.
Numbered Heading 3 This is the same as Heading 3 except that it automatically adds numbers. It will automatically pick up the number of the last Numbered Heading 1 and Numbered Heading 2 and incorporate that into the number. So if the last Numbered Heading 1 was 1 and the last Numbered Heading 2 was 1.4 then this heading will be 1.4.n where n is the number of this heading.
Numbered List This is a straight numbered list - not a heading, but just a numbered list of points. This is the style that is used for the step-by-step instructions in this manual.
Plain Text This style makes the text look as though it was written with a typewriter.
Section Heading This creates a numbered section heading. The word "Section" is added automatically, as well as the consecutive numbering.
Square List This bulleted list uses square's as the bullets.
Star List This is a bulleted list that uses star symbols for the bullets.
Tick List This is this a bulleted list that uses tick symbols (3) for the bullets.
Triangle List This is a bulleted lsit that uses triangle symbols for the bullets.
Upper Case List This is a numbered list that uses consecutive letters in upper case as the numbers.
Upper Roman List This numbered list uses upper case Roman numerals for the numbering.
NOTE: There are lots of styles that do very similar or identical things. You do not have to use Chapter heading for your chapters if you prefer the look of Numbered Heading 1 or even just Heading 1. There are a range of styles predefined, and you can also create your own. Use whichever style you think is most useful for the task at hand.
Using these styles you are able to put together a document that is consistently formatted, while at the same time retaining the ability to change the formatting of the entire document in a very straightforward way. If you use Heading 1 throughout your document whenever you want a main heading, then if you change the Heading 1 style, that change will be reflected throughout your document automatically.
Move the cursor to the very beginning of your document.You can do this by holding down the Ctrl button and then tapping the Home button.
Press the Enter key to make a blank paragraph at the beginning of your document.
Move the cursor back to the first line.
Click the pull-down button associated with the style selector.The list of styles is displayed.
Select the Heading 1 style.
The text will change a larger, bold font.
Type in "My first heading", and then press the Enter key.Notice that the style for the newly created line has gone back to Normal.
One of the handy things about the headings styles is that they automatically return you to normal text after you press the Enter key. If you had simply changed the font in order to make your heading, this font would be retained when you start the next paragraph, and you would subsequently have to manually change it back to the font for normal text. This feature is a part of all of the various headings styles that are available.
Try out each of the styles in the list of available styles to see what effect they have on your text.
You may decide that you do not particularly like the styles as they are provided in the default Abiword installation. If you so choose you can create a new style that is more to your liking. For example, the default "Normal" style does not leave any blank space after each paragraph. If you want to always have a blank line between each paragraph, then you can create your own normal-text style with this format.
Pull down the Format menu and choose the Style option.The following dialogue box will be displayed.

Click on the New button.The following dialogue is displayed.

This dialogue box has the following features.
Field Purpose
Style Name You should enter the name of your new style into this field.
Style Type This allows you to select the kind of style you want to create. There are text styles which relate primarily to the text font, and paragraph styles that apply to an entire paragraph.
Based On You can create a style that starts with the settings of an existing style.
Style for following paragraph This field controls the style that will be selected after you press the Enter key. The way the heading styles are able to switch to the Normal style when you press the Enter key.
Remove Property from Style This button allows you to remove a particular property from a style.
OK Clicking this button will apply any changes that you have made and close this dialogue box.
Cancel Clicking this button will close this dialogue box but discard any changes you have made to the styles.
Format Clicking this combo box will allow you to select the fonts and paragraph formats that you want as part of the style that you are working on.
Enter a name for your style into the Style Name field - call it "Text".
Click on the Format button.A list is displayed (see diagram below)

Click on the Paragraph option.The Paragraph dialogue box is displayed (as below).

Make your selections for paragraph formatting.
Click the OK button when you are satisfied with the paragraph settings you have selected.
Click the Paragraph button.A list is displayed.
Choose the Font option.The following dialogue box is displayed.

Make your font selections.
Click the OK button.
Click the OK button.
Click the Close button.
Click the pull down button associated with the style list on the toolbar and try out your new style.
Go into the style dialogue box and create a new heading style that switches to your Text style when you press the Enter button.